OIDC Authentication
To configure OIDC, a number of steps are required. This includes both Akumen configuration and configuration of the OIDC provider. This guide steps through setting up common providers such as Azure and Google.
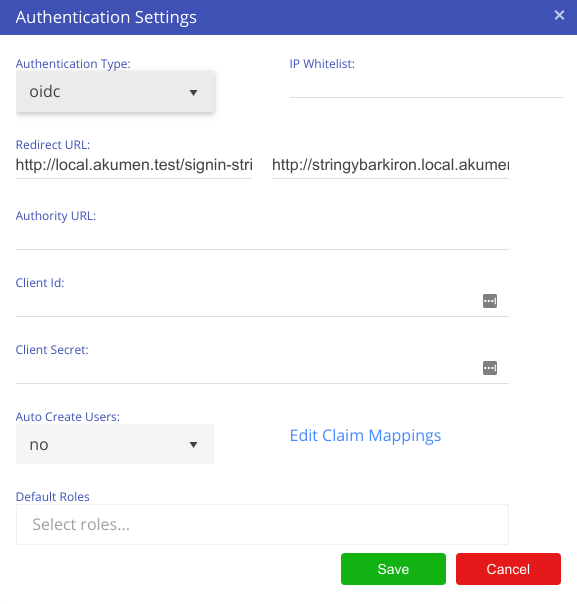
To setup OIDC, change the authentication type to OIDC, as shown below.
| Name | Description |
|---|---|
| Redirect URL | The redirect URL is a unique generated URL, and is unique throughout the Akumen system. There are two generated: The first is for the standard Akumen URL, the second is for future use where the tenancy name can be used as part of the URL. |
| Authority URL | The authority URL is the URL used to authenticate Akumen against. That is, the OIDC provider’s authentication URL. |
| Client Id | This is also the “application id”, that is the unique id provided to you from the provider to allow Akumen to authenticate against that provider. |
| Client Secret | A client secret can be defined on the provider, but can also be left empty if the provider does not require one. For example, Google must have a secret, but Azure may or may not have one. |
| Auto Create Users | With this option enabled, if a user attempts to access Akumen, the user account will be automatically created, but marked as inactive. The user will not be able to login in until the administrator of the tenancy enables that account. |
| Default Roles | Where the provider does not include roles as part of claims (such as Google), the user can be automatically created with the selected role or roles. This is not used with providers that include roles as part of claims (such as Azure). |
| Edit Claim Mappings | Although OIDC is a standard, the claims that the providers can use is not. This provides a mapping of claims Akumen uses, mapped against the provider’s claims. Akumen already has default claim mappings for the three providers Google, Azure and AWS, though they can be edited if required. |
Note
When logging into a client using OIDC, a username is not required. Simply enter @TenancyName into the username box where “TenancyName” is the name of the tenancy you are logging in to.
The password field will disappear once you hit enter or tab out of the username box. If everything has been configured correctly, you will be redirected to your OIDC provider to authenticate against.
Once authenticated, you will be logged into Akumen.
Note
The Akumen user account’s email address is required to either be a match of the OIDC provider’s email address (e.g. Azure, Google) or a plus addressed form of it.
In the former method, if the user’s Azure email address is first.last@company.com, then the user’s Akumen email address must also be set to first.last@company.com.
In the latter method, plus addressing needs to be specified for the user’s Akumen email address. This may be done when a user needs SSO for multiple tenancies in the same Akumen environment.
If using plus addressing, the format of the user’s Akumen email address will need to appear as first.last+tenancyname@company.com.
The Akumen username must also match everything before the @ character in the OIDC provider email address.
For example, if the email address retrieved from Azure is first.last@company.com, then the username must be specified in Akumen as first.last.
Also, the Akumen email address without the plus addressed section must match the OIDC provider email address.
For example, if the email address retrieved from Azure is first.last@company.com, the email specified in Akumen can be first.last+tenancyname@company.com but cannot be firsty.last+tenancyname@company.com.
