Building the Port
The last stage in the build process for this tutorial is to build the port.
- Create a new page and rename it so it is called Port
- Create a new numeric node called Max Port Stockpile Size, and set it’s value to 600,000
- Create a new numeric node called Port Stockpile Starting Balance, with a value of 420,000
- And create a new Prior Value node called Port Stockpile. Link the Port Stockpile Opening Balance into the initialisation port of the Port Stockpile
- Create a new calculation node called Port Stockpile Closing Balance, and link the output of the Port Stockpile to the input of this, then the output of this node back into the input of the Port Stockpile
- We need the Railed Tonnes from the Rail page, so create a new Node Reference, and feed that into the Port Stockpile Closing Balance
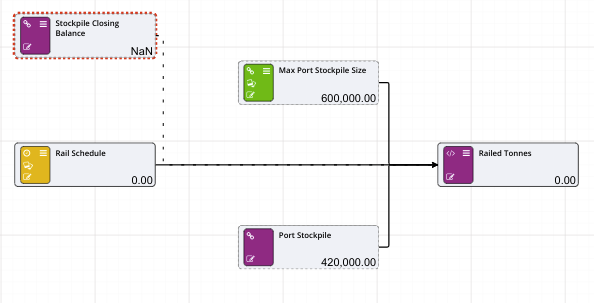
- The Max Port Stockpile Size and Port Stockpile nodes are both required for the Railed Tonnes calculation, so lets right click, and Copy Reference To for both these nodes, and link them to the Railed Tonnes calculation.
- Set the calculation of Railed Tonnes to:
if ([Port Stockpile Opening Balance] + [Rail Schedule] >= [Max Port Stockpile Size], 0, if ([Stockpile Opening Balance] - [Rail Schedule] < 0, 0, [Rail Schedule] ) )
The Rail page should now look like:
- Now switch back to the Port page - we now need to setup the shipping.
- Create a new Timeseries node called Ship Schedule. This is similar to the rail schedule, in that we pull a certain amount of product from the Port Stockpile.
- Click on the value of the new Timeseries node, and set it to 300000 in the first period, 300000 in the 7th (column G) and again in column M. This simulates a once a week arrival of a ship.
- Create a new calculation called Shipped Tonnes, and feed that into Port Stockpile Closing Balance, as well as connecting Shipped tonnes to the input of Shipped Tonnes.
- Create a new Prior Value node called Shipped (this will not have an initialisation value)
- Create a calculation called Shipped Closing Balance, and connect Shipped to this node, then the output of this node back to Shipped.
- Connect Shipped Tonnes to the input of Shipped Closing Balance.
- The Shipped Tonnes calculation should be
if ([Port Stockpile Opening Balance] - [Ship Schedule] < 0, 0, [Ship Schedule] ) - The Shipped Closing Balance calculation should be
[Shipped]+[Shipped Tonnes] - Finally the Port Stockpile Closing Balance calculation should be
[Port Stockpile]+[Railed Tonnes]-[Shipped Tonnes]
The Port page should look like:
That concludes the build part of the driver model. The next step involves stepping through time and finding where we have issues with our supply chain.

