Completing the Model
To complete the model we need to add one more node, the Prior Value node. The Prior Value node will allow us to sum up the end of month balances to find out when there will be a return on the $10000 originally put into the coffee shop.
Prior Value Nodes are used to access the value of a node from the previous time step. They are especially useful for calculating balances. Driver Models typically calculate the closing balance and the Prior Node is used to determine the opening balance, today’s opening balance is yesterday’s closing balance (for more information on Prior Value nodes click here).
- Drag a Prior Value node onto the workspace somewhere under the Cash Flow Calculation node.
- Rename the node Start of Month Balance.
- Drag a Numeric node onto the workspace to the right of the Prior Value node.
- Rename this one Start Capital.
- Set the value fo this node to 10000.
Note
Prior Value Nodes are different to normal nodes in that they have two separate input ports; one on the left and one on the top. The top port is for the initial or starting value of the node and provides a value from before the first timestep, ie t = -1. This value will be used for the first timestep in the series. When the initial value is zero this input port can be left empty. The second port is for the closing value that will become the starting value for the next timestep. Hovering over each port will display a tool tip with information on the purpose of each port.


- Connect the Numeric node to the top port of the Prior Value node.
- Drag a Calculation node onto the workspace to the left of all the nodes.
- Rename this node End of Month Balance.
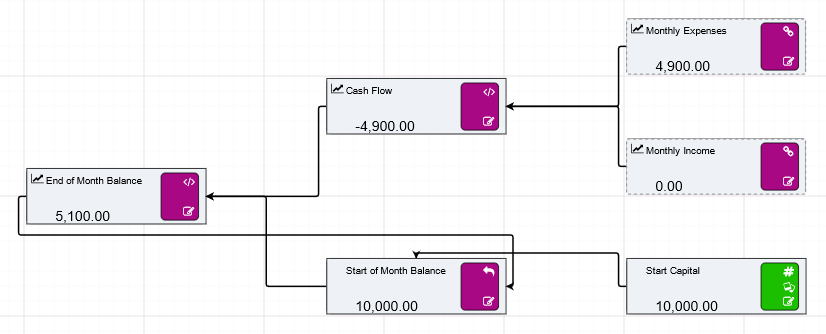
- Connect Cash Flow and Start of Month Balance (the Calculation node and Prior Value node) to the End of Month Balance Calculation node.
- Go into the Expression editor for the End of Month Balance node and enter the expression
[Start of Month Balance]+[Cash Flow]by dragging the two connected assets from the list into the editor. - Take the output of the Calculation node and connect it to the normal input port on the Prior Value (Start of Month Balance) node.
Your Driver Model should look like the image below.


Ensure the Automatic Evaluation toggle is on, then step through time to see when John will make a return on his coffee shop. You should find that by the tenth timestep the End of Month Balance should be 11350, so we can say that John will make a return at around 11 months.
Warning
Before moving on to the Research part of this tutorial make sure that you have ticked the Publish to Results tick box in the properties bars of the nodes in your Driver Model. A quick way to set all nodes to Publish to Results and Publish to Research is to right click on a page (eg the Bank Account page), and select the Parameter Control option. This enables the toggles for all nodes on the page. Click Recurse Child Page to set it for all pages.
You have now completed a Driver Model. The next part of the tutorial is using the Research Grid to find the best price for a cup of coffee to maximize the return. Proceed to research to learn how to research the coffee shop findings, or click here to build the same application in Python or here to build the same application in R